
How to Assemble a Yealink Phone
This guide walks you through assembling a new Yealink desk phone — attaching the stand, plugging in the handset, routing the cables, and connecting power and the network. The whole process takes a few minutes.
What You Will Do
- Attach the stand.
- Connect the handset.
- Connect the network and power.
Step 1: Attach the Stand
Follow the diagram below to clip the stand onto the back of the phone. The stand has multiple angle settings — choose the one that gives you a comfortable view of the screen at your desk.

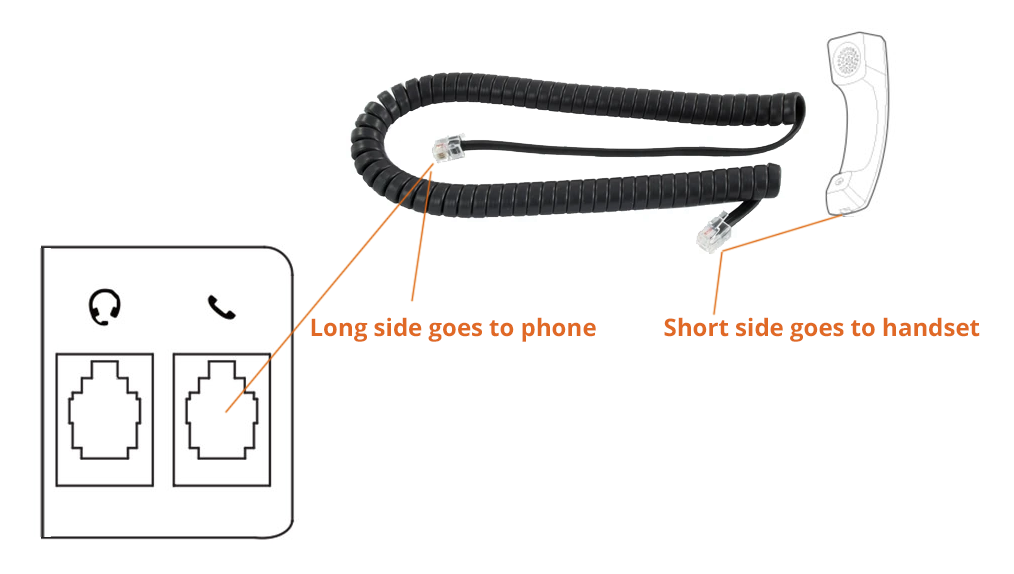
Step 2: Plug In the Handset
Plug the short end of the coiled handset cable into the handset, and the long end into the handset port on the back of the phone.
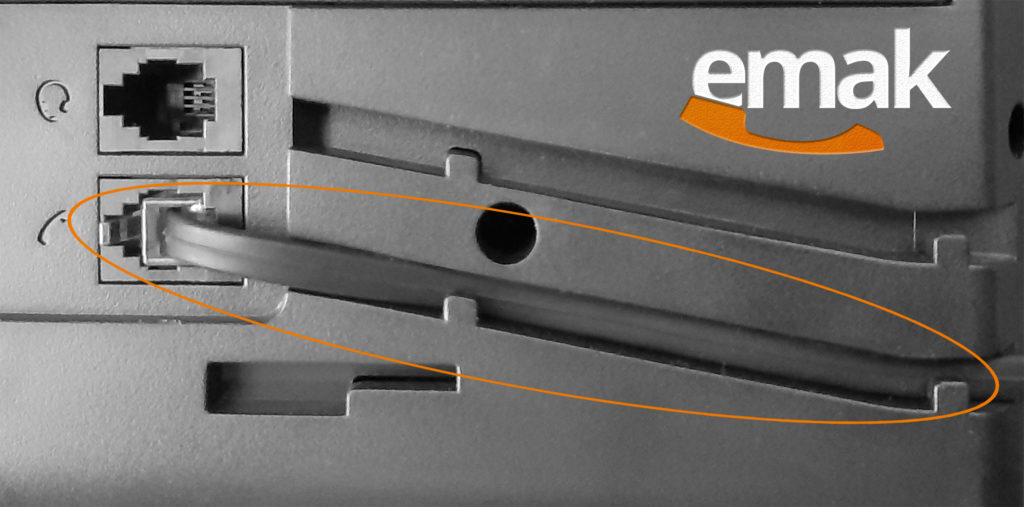
Route the cable neatly behind the phone, tucking it through the cable management tabs so it does not get pulled out by accident.
Step 3: Connect the Network and Power
You have two options for powering and networking the phone. Your system administrator will tell you which one to use.
- AC power — using the included power adapter.
- Power over Ethernet (PoE) — power and network share the same cable.
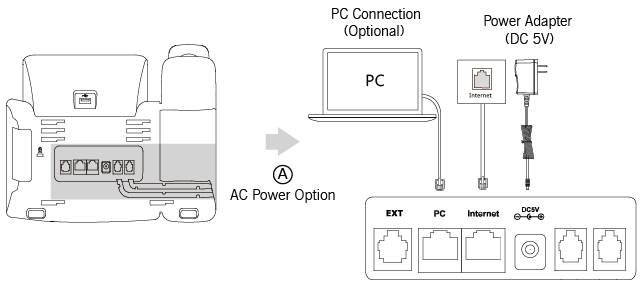
Option A: AC Power
- Plug the DC connector of the power adapter into the DC 5V port on the back of the phone.
- Plug the other end of the power adapter into a wall outlet.
- Connect an Ethernet cable (the one in the box, or any standard Ethernet cable) between the Internet port on the phone and your network wall jack or switch.
Option B: Power Over Ethernet (PoE)
If your network switch is PoE-compliant, the Yealink can run on a single Ethernet cable that delivers both data and power.
- Connect the Ethernet cable between the Internet port on the phone and an available port on your PoE switch.
You do not need the AC power adapter when using PoE. Make sure the switch or hub is PoE-compliant — a regular non-PoE switch will not power the phone.
The phone has a second Ethernet port (the PC port) that you can use to share the network connection with a desktop or other device. This connection is optional, and we recommend using the Ethernet cable supplied with the phone for best results.
Important: Do not remove power from the phone while it is updating firmware or configuration — it can leave the phone in an unrecoverable state.
Yealink Assembly FAQ
Which power option should I use?
If your office has a PoE switch, use PoE — it eliminates the AC adapter and one extra cable, and the phone restarts cleanly along with the network. Use the AC adapter if your office does not have PoE.
What if my switch is not PoE-compliant?
Use the supplied AC adapter, or buy an inline PoE injector for that single phone. Plugging the phone into a non-PoE switch will give you network but no power.
What is the second Ethernet (PC) port for?
The PC port lets you share the network drop with a computer at the same desk — plug your computer into the PC port instead of the wall, and both devices share the same cable. This is optional; if you have separate network drops, you can leave it unused.
Why shouldn’t I unplug the phone during a firmware update?
Yealink phones download and apply firmware in stages. If you cut power partway through, the phone can be left with a corrupted firmware image and may not boot. Wait until the screen returns to the idle state before unplugging.